FAQ
Frequently Asked Questions
Easy and quick reply
Answers to frequently asked questions are found on this page. If your question is not among them or if you have any remarks or suggestions for our frequently asked questions section, please contact us.
FAQ General
At our head office in Wijchen 3 fully equipped Nooteboom service vans are at the ready to come to your aid. For service support or calamities, 24 hours a day, 7 days a week, throughout Europe. Our network of Nooteboom Service Centres provide quick and efficient help anywhere in Europe.

Outside office hours and on weekends: 4 – 7:30 a.m. +31653868599
Within office hours on working days: 07:30 – 16:00 +31246488834
Use your basic scheme of your trailer as a back up.
If you are going to add working lights now, for example, use the correct diagramSee the handbook supplied with the vehicle.
For more information email se*****@*******om.com
Deze instructievideo geeft in grote lijnen de stappen weer die nodig zijn bij het wisselen van een binnenwiel van een pendel-as.
Wij raden u aan om het hoofdstuk “Binnenwiel wisselen”van de bedieningshandleiding aandachtig door te lezenvoordat u het binnenwiel gaat verwisselen.

FAQ Maintenance
- The type of filter I should use is in the manual that comes with the vehicle.
- The trailer’s manual states which type of grease to use with which lubrication system.
- The handbook that comes with the trailer specifies which oil to use, note in certain countries special oil must be used.
Your service centres for your country
FAQ Ramps
Remove the 4 white plastic screws and remove the control panel.
CAUTION: There are 2 different circuit boards in circulation (see photos). In the circuit board on the bottom right or middle right is the 5amp fuse.

The required information.
One can read the required information there.
- Check if the fuse in the ramp control box is still intakt.
- Is the Hytos oil pump getting power from the Nato plug?
- Do I have power to my ramp control box?
The fuse (5Amp) on an ASD is on the right – rear inside against the bumper in a white junction box.


Nooteboom Trailers has almost all parts for your ramps directly in stock.
You can order these parts by phone or e-mail.
You can also select parts yourself on our website’s ‘parts catalogue’ and put them in your quotation folder.
After completing the quotation request, we will contact you as soon as possible.


FAQ Suspension
- Controleer de sticker op de trailer

First check the compensating cylinders, non-return valve, ball valves, HD hoses of the lift shaft to see if there is any leakage visible externally.
If not, there is internal leakage.
- Check the compensation cylinders, ball valves, flow control valve, non-return valves, HD hoses for external leakage.
Should this not be the case es there is an internal leakage.
For air suspension:
- Check air bellows, 5 position valve, ride height valve.
Usually these leaks are audible, otherwise look for them with an air leak meter.
- Check the compensation cylinders, ball valves, flow control valve, non-return valves, HD hoses for external leakage.
Raising and lowering the loading floor is only for special situations. Some examples are:
- Passing under a low viaduct.
- Driving on and off a ferry.
- Loading a specific load.
In these cases, the ride height can be lowered or raised.

Warning!
When lifting and lowering, only the driver should be near the vehicle combination.Warning!
Be careful not to pinch any body parts.!
Caution!
With the loading floor in the lowered position, the maximum speed is limited to 10 km/h.!
Caution!
When the loading floor is in the lowered position, there is no axle compensation and no vertical axle movements are possible. Driving in these positions should be avoided as much as possible!!
Caution!
Before changing the height of the loading floor, check whether there is sufficient air pressure in the air reservoir.Note!
To stop the loading floor in an intermediate position, the lever can be turned to position 4, see Figure 7-3.- Place the vehicle combination on a level surface.
- Make sure there is sufficient air pressure in the air reservoir.
- Turn the lever from the driving position (3) to the lowering position (5). The loading floor will now lower.
- When the loading floor has reached the desired height, turn the lever from the lowering position (5) to the stopping position (4). The set height is ‘held’.
- Clear the obstacle.
- Place the vehicle combination on a level surface.
- Turn the lever from stop position (4) to travel position (3). The loading floor now rises. The driving height will automatically return to the correct driving level.


Nooteboom Trailers has almost all parts for your suspension system directly in stock.
You can order these parts by phone or e-mail.
You can also select parts yourself on our website’s ‘parts catalogue’ and put them in your quotation folder.
After completing the quotation request, we will contact you as soon as possible.


FAQ Brakes
See handbook supplied with the vehicle.
For more information email se*****@*******om.com
- First, check all fuses in the truck cab if they are still good.
- Check the ABS/EBS cable and sockets for corrosion.
- Is the ABS/EBS plug in properly and in the correct position?
- EBS computer read out whether the values still match.
- Possibly to the brake bench and or reset brakes.
FAQ Steering
See handbook supplied with the vehicle.
For more information email se*****@*******om.com
- Check that all intermediate cables (NATO + ISO-N + ISO-S + ABS/EBS) are connected. It is important that the above cables are all connected!
- Check the intermediate cables for visible damage and check truck and trailer plugs and sockets. It sometimes happens that a contact pin is pushed back when connecting the intermediate cables, which means it no longer makes good contact and thus causes a malfunction.
- Check the fuses of the manual steering (see where are the fuses of my steering).
- Check whether the red warning lamp on the front left of the trailer is flashing. When this lamp flashes, it indicates that the ASA control board mounted in the steering box is not receiving a speed signal.
- When all the above items have been checked and the manual steering still does not work, please contact our service workshop in Wijchen or in Zwijndrecht (NL)(D) (B) to make an appointment > schedule a service engineer.
Contact details
Do you have a semi-trailer with or without hand steering?
With hand steering:
When you operate the ‘automatic centre position’ button on your remote control, the axles of the semi-trailer will automatically turn into the straight ahead position.
Hold this button and drive your truck forward in a straight line at a walking pace.
While doing so, look in the mirrors to assess whether you are driving straight ahead of the trailer.
When the combination is aligned, you can release the knob.
If you feel that the alignment is still not 100%, you can manually adjust the axles of the semi-trailer to the left or right, if required, by briefly pressing the Align Left or Align Right button on your remote control.
Without manual steering:
You drive the truck at walking pace, steering left or right in such a way that the axles of the semi-trailer twist into the straight-ahead position.
You can check whether the marks on the steering wing or on the axle assembly are exactly in line with each other.
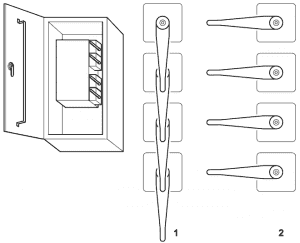
When the axles of the trailer are exactly centred, stop and open the 4 taps in the control box.
Now drive the truck exactly straight in front of the trailer, now the axles of the trailer will remain in the straight-ahead position.
When the truck is directly in front of the trailer, put the 4 cranes in the control box back into driving position.
The combination is now aligned.

1: crane position closed (driving position)
2: position of cranes open (alignment)
You drive the truck at walking pace, steering left or right in such a way that the axles of the trailer turn into the straight-ahead position.
You can check whether the marks on the steering wing or on the axle assembly are exactly in line with each other.
When the axles of the trailer are exactly centred, stop and open the 4 taps in the control box.
Now drive the truck exactly straight in front of the trailer, now the axles of the trailer will remain in the straight-ahead position.
When the truck is directly in front of the trailer, put the 4 cranes in the control box back into driving position.
The combination is now aligned.
1: crane position closed (driving position)
2: position of cranes open (alignment)
The electric/hydraulic steering system is protected by several fuses.
These can be found in the following places;
- In the ASA control board > 2 X 7.5 Amp fuses (click here for photo)
- Directly on the + pole of the battery on your tractor Main fuse 250 Amps (click here for photo)
- In the receiver of your mobile phone control 10 amp glass fuse (click here for photo)
The hydraulic cylinders of the hydraulic steering system are fitted with bleed connections. Where necessary, these are fitted with extension hoses with the quick connectors fitted in easily accessible places. Stickers with the colour of the circuit indicate…
- You may encounter the following situations:
- The red control lamp is off: (all functions both hydraulic and electrical are OK, or the 24volt voltage from the Battery/Nato cable is not present, or the lights are not switched on)
- The red control lamp is flashing: (speed signal not present on the ASA PCB connection Nr23 blue/black)
- The red control lamp lights up continuously: in 1 or more hydraulic control circuits (red/blue/green/yellow, too little pre-pressure is present.
- The red control lamp blinks and lights alternately for 15 sec : the speed signal is not present and in one or more hydraulic control circuits (red/blue/green/yellow, too little pre-pressure is present.
The red light may illuminate for several seconds when you steer the truck left or right (e.g. when taking a turn).
After taking the turn, the lamp should go out automatically when the truck has reached the straight-ahead position, you do not need to do anything in this case.
If the lamp stays on, there is too little pre-pressure in the hydraulic steering system.
If your vehicle is equipped with manual steering, you should operate it briefly counterclockwise and clockwise then return it to the automatic centre position.
Now the red lamp will be off and there is again sufficient pre-steering pressure in the steering system.

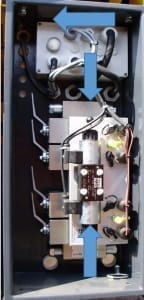
Whether your trailer is equipped with an emergency system depends on the year of manufacture and the version of the ASA control board, if this ASA board (grey junction box in the image below) is equipped with a white push button, your trailer is equipped with an emergency system, in all other cases it will have to be checked on site what caused the malfunction.
The emergency system works as follows:
You press the white push button, with this you activate the pump, at the same time you move the steering slider (mounted on the aluminium manifold) via the black ball buttons all the way down or up or from left to right(depending on the position of this steering slider) with this you activate the emergency system and you can move the axles.
Caution:
The brakes must be released and when loaded drive slowly forwards or backwards to minimise friction/resistance between the tyres and the road surface.
Should this not work please contact the Afd. Aftersales or service workshop Wijchen or Zwijndrecht for an appointment, or to call in a service technician.
Nooteboom Trailers has almost all parts for your steering directly in stock.
You can order these parts by phone or e-mail.
You can also select parts yourself on our website’s ‘parts catalogue’ and put them in your quotation folder.
After completing the quotation request, we will contact you as soon as possible.
Factory standards for the MOT inspection
- For the EURO, IC, OVBT and OVBQ and MANOOVR, this is measured 570 mm (dimension A) from the centre of the knee bearing.
- The shuttle bus must be horizontal.
- Measurement is done with the tyres on the ground and on the brake, passing through any play that may be present by hand steering. This may not exceed 5 mm in either direction.
- The measurement may also be done by fixing a ruler to the cover of the knee bearing. The ruler/measuring point should be (in the side view) in the centre of the knee bearing. Make sure that the distance A is correct as in the figure below.


NOVAB3.0
Maybe the email is in your spam box, or it is bounced by the spam filter. Please check. You can contact no***@*******om.com. Via https://novab.nl/forgotten-password you can reset your password.
We also notice that Novab is not optimally equipped for vehicles with extension beams. To simulate this situation, we recommend the following:
Create a new trailer include the extension beams integrated in the trailer’s fixed floor. Now you have to create a load in Novab with the weight of the extension bars to simulate the extra weight.
There is no image associated with the load. As a result, the program cannot graphically display the truck, trailer and load combination. After you have created an image of the load , you can make the background transparent with https://www8.lunapic.com/editor/?action=transparent.
- You first have to delete the calculation which with are made with these vehicle / load
Novab doesn’t function with Internet Explorer. You have to use Google Chrome or Firefox.
Watch the how-to videos here


If your question is not available, please fill in the form below!
* indicates required fields
Contact
Need instant contact for service, aftersales or parts?
Nooteboom makes service on your trailer easy. Call the service department during office hours or our mobile 24/7 emergency service when needed. If you need telephone support, you can contact aftersales during office hours. Our mobile service vans are equipped to carry out maintenance, repairs and inspections on site, saving you time and keeping your operations running smoothly. At our logistics centre in Wijchen, we can supply more than 4,000 parts from stock for trailers of every make and model, regardless of the year of manufacture.

Service
Agreement
Maintenance, repairs and inspections.
On weekdays between 7:30am - 4pm.
service@nooteboom.com


After
Sales
Within office hours on working days
from 07:30 - 16:00.
aftersales@nooteboom.com


Spare
Parts
Whatever component you need, you can find it on our spare parts web shop. More than 200,000 parts are available.